
A leaky faucet is one of the most common calls plumbers receive, and for good reason, it’s annoying, wastes water, and can spike utility bills. As a field technician, being able to diagnose a leaky faucet quickly and accurately is a skill that saves time, impresses clients, and boosts your efficiency.
Whether you’re troubleshooting a dripping kitchen sink or a bathroom faucet that won’t stop, this fix leaky faucet troubleshooting guide will walk you through the process in five minutes or less. By mastering these steps, you’ll handle jobs faster and avoid unnecessary repairs, making your day easier and your customers happier.
In this article, we’ll cover how to diagnose leaky faucet issues systematically, using tools you likely already have in your kit. We’ll explore common causes like worn O-rings, corroded valve seats, and loose components, and provide a leaky faucet repair guide that’s practical for both novice and seasoned plumbers. Let’s dive into the steps to troubleshoot and resolve faucet leaks with confidence.
Why Diagnosing a Leaky Faucet Matters
Before jumping into the how to diagnose a leaky faucet process, let’s understand why speed and accuracy are critical. A single dripping faucet can waste up to 3,000 gallons of water per year, according to the EPA, which frustrates homeowners and drives up costs.
For plumbers, a quick diagnosis means you can move on to the repair or the next job without wasting time. Plus, pinpointing the exact issue (e.g., a faulty cartridge versus a loose nut) prevents costly mistakes like unnecessarily replacing parts. This guide focuses on troubleshooting efficiently, so you can provide value to clients and keep your schedule on track.
Tools You’ll Need for Troubleshooting
To diagnose a leaky faucet in five minutes, gather these basic tools:
- Adjustable wrench: For loosening and tightening components.
- Screwdriver (Phillips and flathead): To remove faucet handles or screws.
- Flashlight: To inspect hard-to-see areas under the sink.
- Clean rag: For wiping parts and checking for leaks.
- Plumber’s tape (optional): Handy for quick fixes on threaded connections.
These tools are staples in any plumber’s kit, ensuring you’re ready to tackle the job without delays. If you’re looking for tool recommendations, check out our upcoming post on the best pipe wrench for plumbing to upgrade your gear.
Step-by-Step Leaky Faucet Troubleshooting Guide
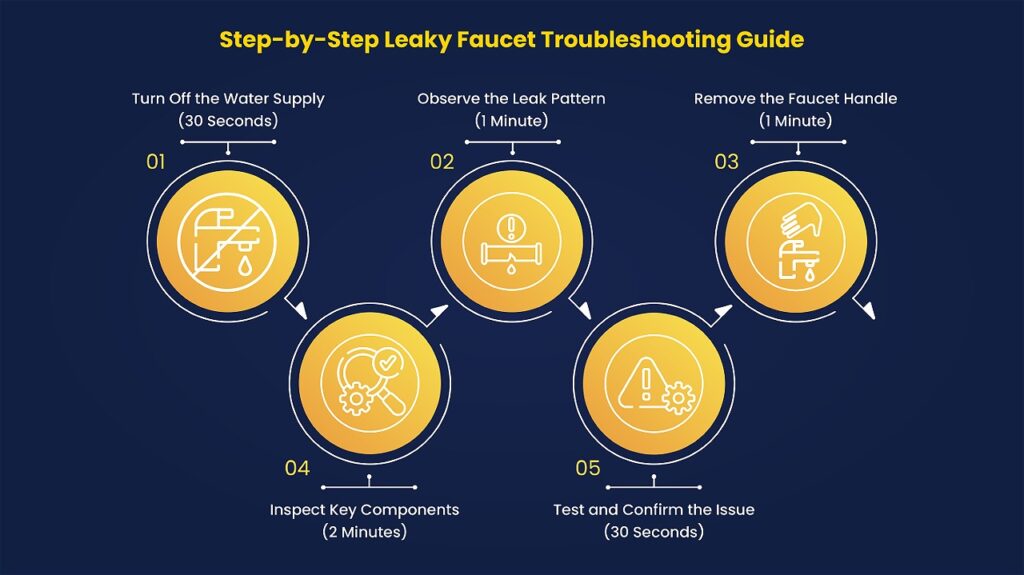
Here’s a streamlined process to diagnose a leaky faucet, designed to fit within a five-minute window. Follow these steps to identify the cause and plan your repair.
Step 1: Turn Off the Water Supply (30 Seconds)
Safety first. Locate the shut-off valves under the sink and turn them off to stop water flow. If there are no local valves, shut off the main water supply. Test the faucet to confirm no water comes out. This step prevents messes and ensures you can work without water spraying everywhere.
Step 2: Observe the Leak Pattern (1 Minute)
Run the faucet briefly (if possible) before fully disassembling it to understand the leak’s behavior.
Ask yourself:
- Is it dripping from the spout? This often points to a worn O-ring or washer.
- Is water leaking from the base? A faulty cartridge or loose mounting nut might be the culprit.
- Does the leak occur only when the faucet is on? This suggests a valve seat or seal issue.
For example, a client once called about a kitchen faucet leaking at the base only when turned on. By observing the pattern, I traced it to a cracked cartridge, saving time on disassembly. Noting the leak’s location and timing narrows down the cause quickly.
Step 3: Remove the Faucet Handle (1 Minute)
Using a screwdriver, remove the screw holding the faucet handle (usually hidden under a decorative cap). Gently pry off the handle to access the internal components. Be careful not to strip the screw or damage the handle, as clients notice cosmetic issues. If the handle is stuck, a bit of penetrating oil can loosen it without forcing it.
Step 4: Inspect Key Components (2 Minutes)
With the handle off, examine the faucet’s internals.
- O-rings and washers: Look for cracks, wear, or improper seating. A worn O-ring is the most frequent cause of spout drips.
- Cartridge or stem: Check for cracks or mineral buildup. Single-handle faucets often use cartridges, while double-handle ones use stems.
- Valve seat: Corrosion or debris here can cause leaks, especially in compression faucets.
- Seals and gaskets: Ensure they’re intact and properly aligned.
Use your flashlight to spot mineral deposits or damage. For instance, in a recent job, I found a client’s bathroom faucet had a loose O-ring causing a steady drip. Tightening it resolved the issue without a full repair, saving time and parts.
Step 5: Test and Confirm the Issue (30 Seconds)
If you’ve spotted a clear problem (e.g., a cracked washer), you’ve likely found the cause. If not, reassemble the faucet temporarily, turn the water back on, and test again to confirm the leak’s source. This step ensures you don’t miss subtle issues like hairline cracks in the cartridge.
Common Causes and Quick Fixes
Here’s a leaky faucet repair guide for the most frequent issues you’ll encounter during troubleshooting:
- Worn O-ring: Replace with a matching size (take the old one to the hardware store). Apply plumber’s grease to prevent future wear.
- Corroded valve seat: Clean with a valve seat wrench or replace if damaged. This is common in older homes with hard water.
- Loose components: Tighten any loose nuts or screws, such as the mounting nut under the sink.
- Faulty cartridge: Replace the cartridge, ensuring it matches the faucet brand (e.g., Moen or Delta). Keep spares in your van for common models.
- Mineral buildup: Soak components in vinegar to dissolve deposits, then scrub gently with a brush.
Pro tip: Always carry a faucet repair kit with assorted O-rings, washers, and screws. It’s a time-saver and lets you fix many leaks on the spot without a second trip.
When to Escalate the Repair
Not every leaky faucet can be fixed in five minutes. If you encounter these scenarios, a deeper repair or replacement may be needed:
-
- Cracked faucet body: A hairline crack in the faucet itself requires full replacement.
-
- Severe corrosion: Extensive damage to internal parts may make repair uneconomical.
-
- Obsolete parts: Older faucets may use discontinued components, necessitating an upgrade.
In these cases, explain the issue to the client clearly and offer options, such as replacing the faucet with a modern, water-efficient model. Our upcoming post on repiping a home step by step can help if the issue stems from broader plumbing problems.
Tips to Make Troubleshooting Easier
To streamline your fix leaky faucet troubleshooting process, try these field-tested tips:
-
- Keep a checklist: Create a mental or written checklist (water off, observe leak, inspect parts) to stay organized under pressure.
-
- Know faucet types: Familiarize yourself with compression, ball, cartridge, and ceramic-disk faucets. Each has unique components and failure points.
-
- Educate clients: While working, explain simple maintenance tips (e.g., avoiding overtightening handles) to prevent future leaks and build trust.
-
- Stock up smartly: Read our guide on how field techs can save on plumbing supplies to keep your van stocked affordably.
Why Speed Matters for Plumbers
Diagnosing a leaky faucet in five minutes isn’t just about efficiency, it’s about reputation. Clients appreciate techs who solve problems quickly without cutting corners. A fast, accurate diagnosis also frees up time for other jobs, increasing your daily productivity. Plus, by fixing leaks promptly, you’re helping clients save water and money, which can lead to repeat business and referrals. Check out our post on how to use customer reviews to market your services to turn satisfied clients into five-star reviews.
Common Mistakes to Avoid
Even experienced plumbers can slip up during troubleshooting. Watch out for these pitfalls:
-
- Skipping the water shut-off: Always turn off the water to avoid flooding or injury.
-
- Overlooking small leaks: A tiny drip can indicate a bigger issue, like a failing cartridge.
-
- Using mismatched parts: Ensure replacement O-rings or cartridges match the faucet model to prevent further leaks.
-
- Rushing reassembly: Double-check that all components are secure before turning the water back on.
Conclusion
Learning how to diagnose leaky faucet issues in five minutes is a game-changer for plumbers. By following this leaky faucet repair guide, you can pinpoint the cause—whether it’s a worn O-ring, loose nut, or corroded valve seat—and move on to the repair with confidence.
The key is preparation (having the right tools), observation (noting the leak’s pattern), and systematic inspection (checking each component). With practice, you’ll handle these jobs faster, impress clients, and keep your workday running smoothly.Next time you’re on a call, use this fix leaky faucet troubleshooting approach to save time and deliver results.
For more ways to level up your skills, explore our blog on smart plumbing tools for leak detection to stay ahead of the curve. Got a tricky faucet job? Share your experience in the comments or ask for tips, we’re here to help you make every job easier.